Did you know that a closed terrarium (a bottle garden with an airtight seal) can essentially sustain itself with minimal to no care at all? The idea of creating your own self-sustaining ecosystem in a bottle is quite fascinating. Think of it as a mini greenhouse. Where open terrariums can contain arid, succulent-type plants, ferns and other humid-loving plants do best in a closed terrarium.
There are many types of terrariums you can make; however, this article is dedicated to closed terrariums. The purpose of closed terrariums is to create a small bottle garden that can survive without constant care. Keep reading to see how to create a self-sustaining ecosystem of your own.
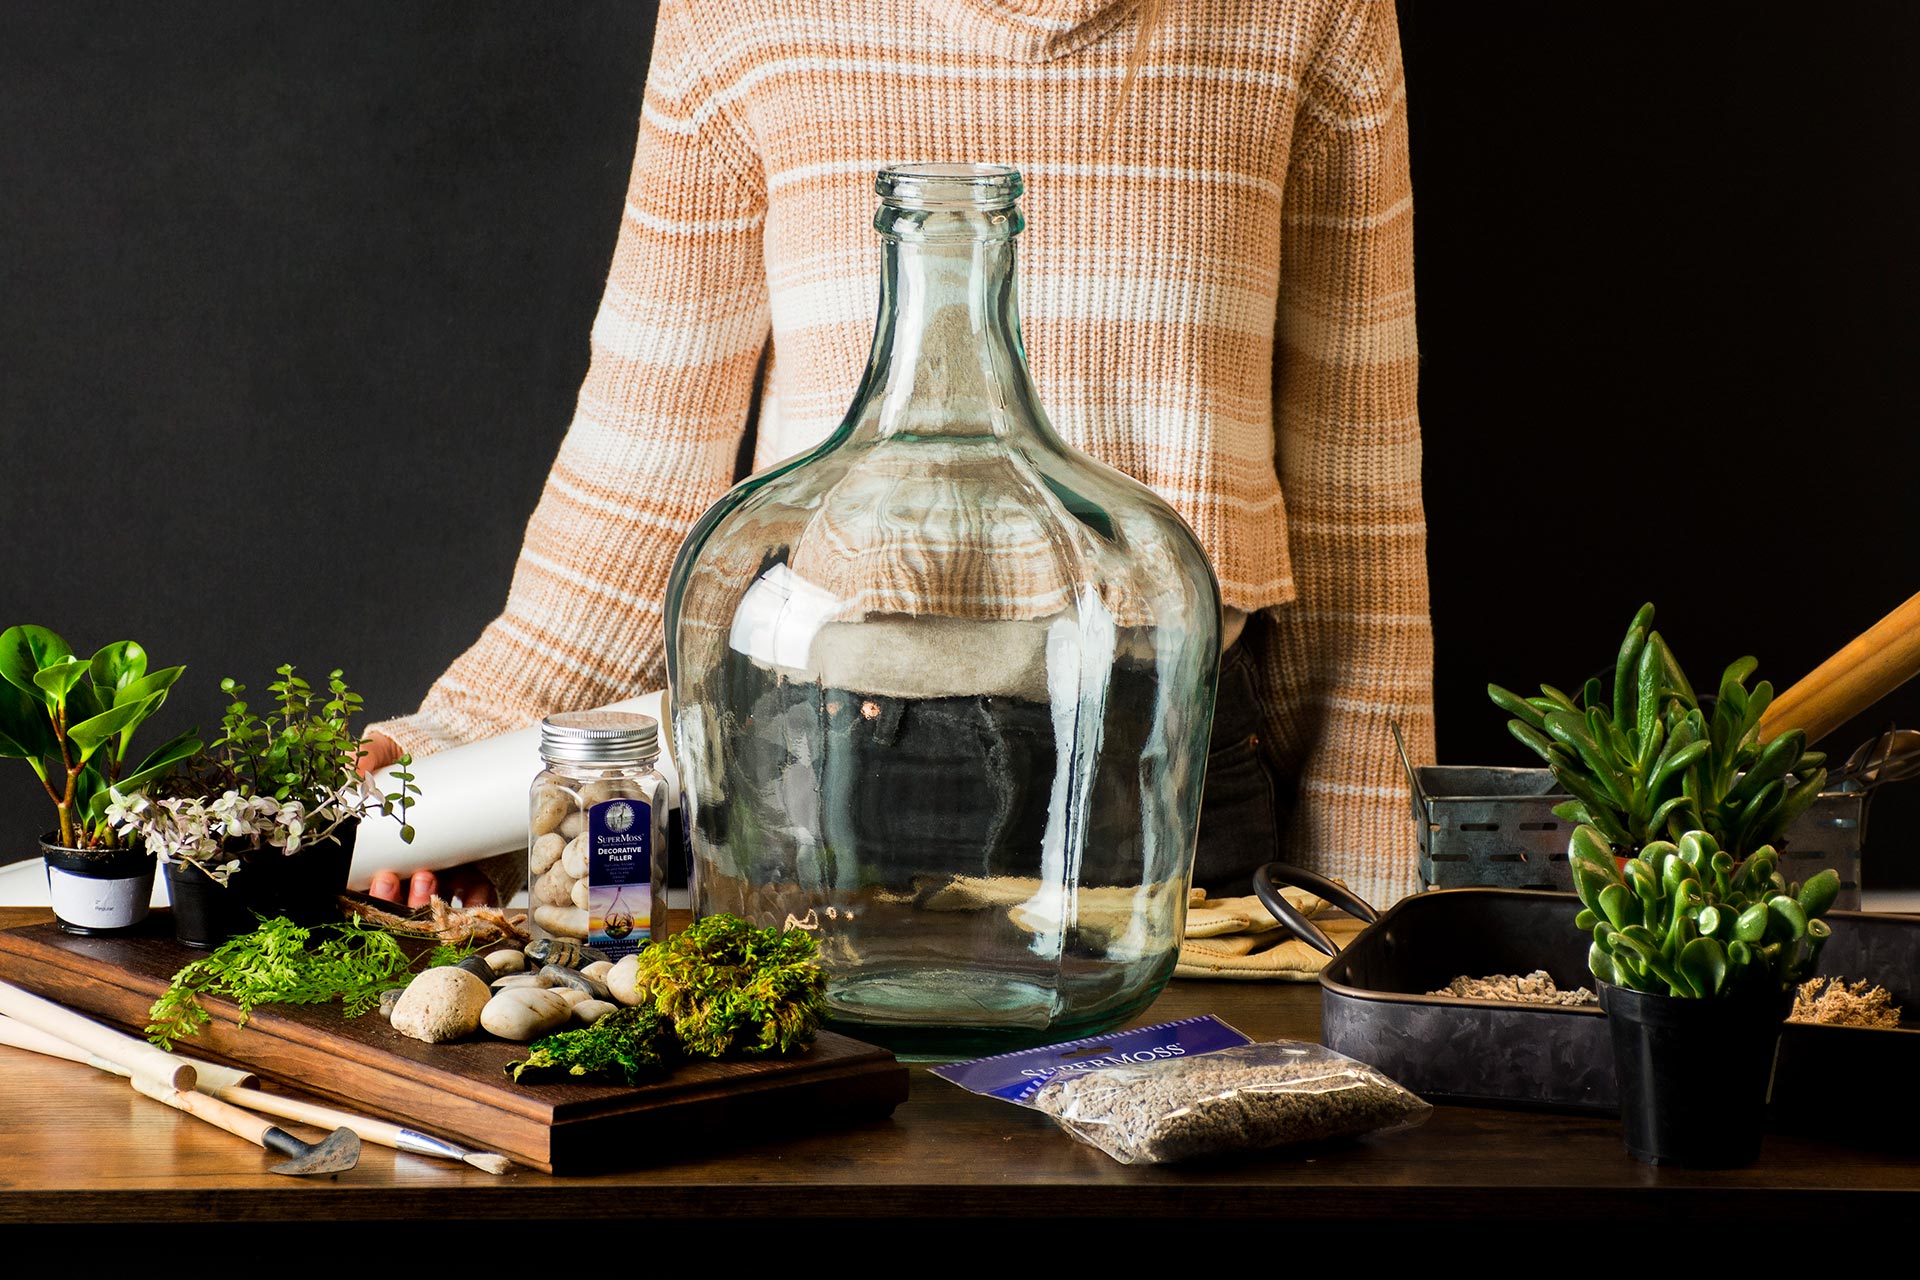
Materials Needed to Make a Bottle Garden
- Stones for drainage
- Activated Charcoal
- Potting Mix
- Small high-humidity plants
- Springtails (optional)
- Preserved mosses
- Glass vessel with a lid (you can repurpose a glass jar or choose from a selection of vintage ones at a thrift store)
- Substrate barrier or sphagnum moss
Recommended Plants for a Bottle Garden
Choose plants that like high humidity – like ferns, calathea, and peperomia
We recommend choosing small, humid-loving plants for your closed terrarium. A closed container will emulate the conditions of a greenhouse. This high-humidity environment is ideal for plants like ferns and nerve plants.
We recommend choosing slow-growing plants for closed terrariums, including peperomia, nerve plants, and live mosses.
Succulents, cactuses, and other dry plants are not recommended for closed terrariums. We also recommend staying away from air plants as these plants need a significant amount of airflow to survive.
Here are the best plants for closed terrariums-
- Maidenhair Ferns
- Tradescantia Varieties
- Creeping Fig
- Ivy
- Fittonia or Nerve Plants
- Peperomia
Steps to Make a Bottle Garden
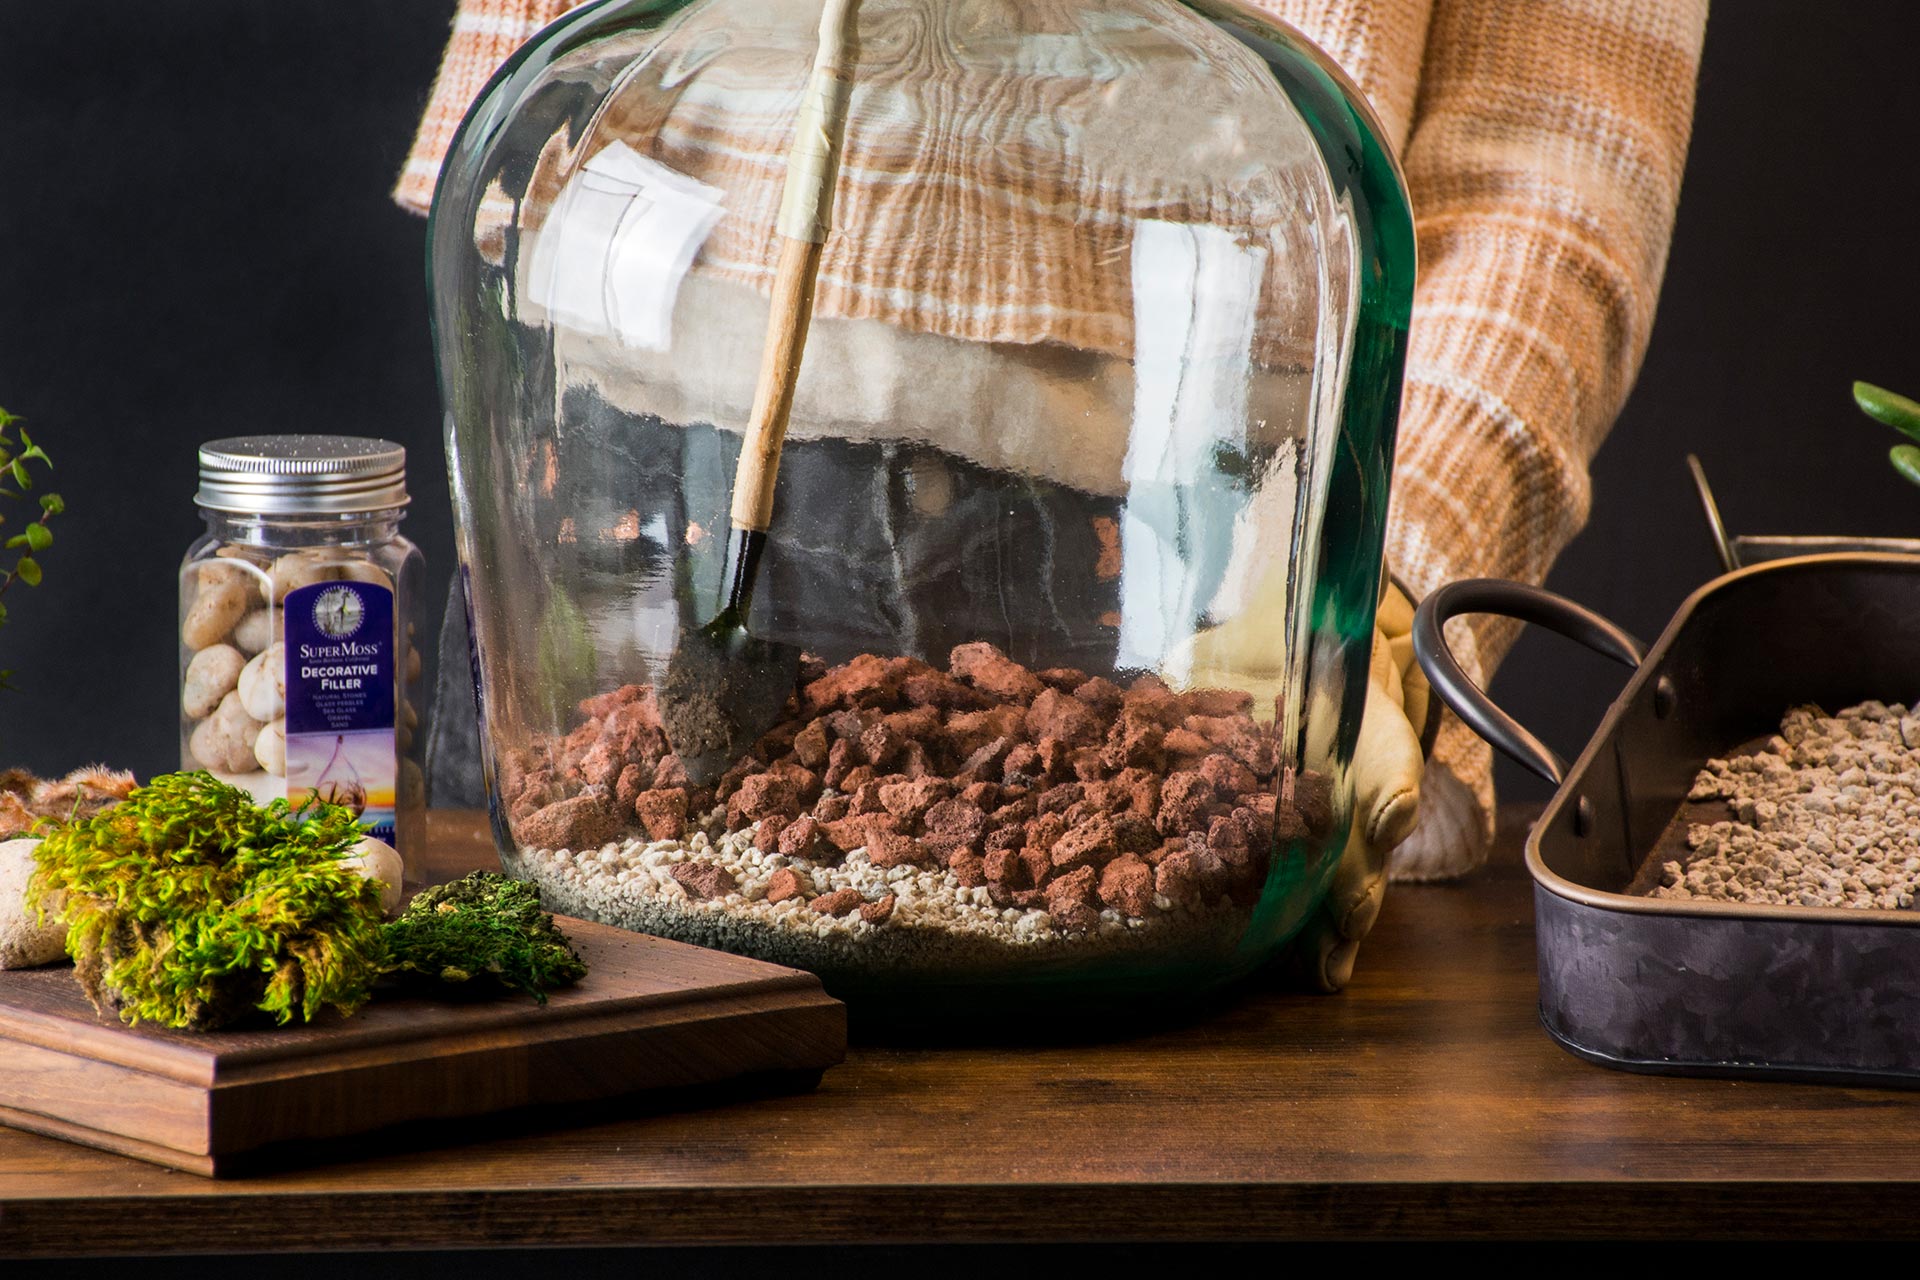
1. Create a False Bottom/ Drainage Layer
Also known as a drainage layer, the false bottom is like a reservoir that holds all the excess water—arguably one of the most important steps!
For the drainage layer, add a layer of stones to the bottom of your terrarium. This layer will allow water to drain from the soil and prevent water from building up around the roots. Moreover, the drainage layer is vital in preventing root rot. If you tend to overwater your plants, then do not leave this step out!
For our false bottom, we added a thin layer of pumice (for decorative purposes) followed by a thicker layer of Lava Rocks.
2. Add Separation Layer
This layer will act as a barrier between your drainage layer and the substrate layer. Without a separation layer, the root growth will find its way into your false bottom—that is root rot just waiting to happen!
This step is important if you wish to keep your terrarium for a long time. After the drainage layer, you need something that will separate it from the next layer.
For our separation layer, we used a substrate barrier from our friends at Galapagos Pet. However, you can also use any mesh or netting material you have in your home.
Simply scrunch down the barrier and it will expand once dropped in the bottle.
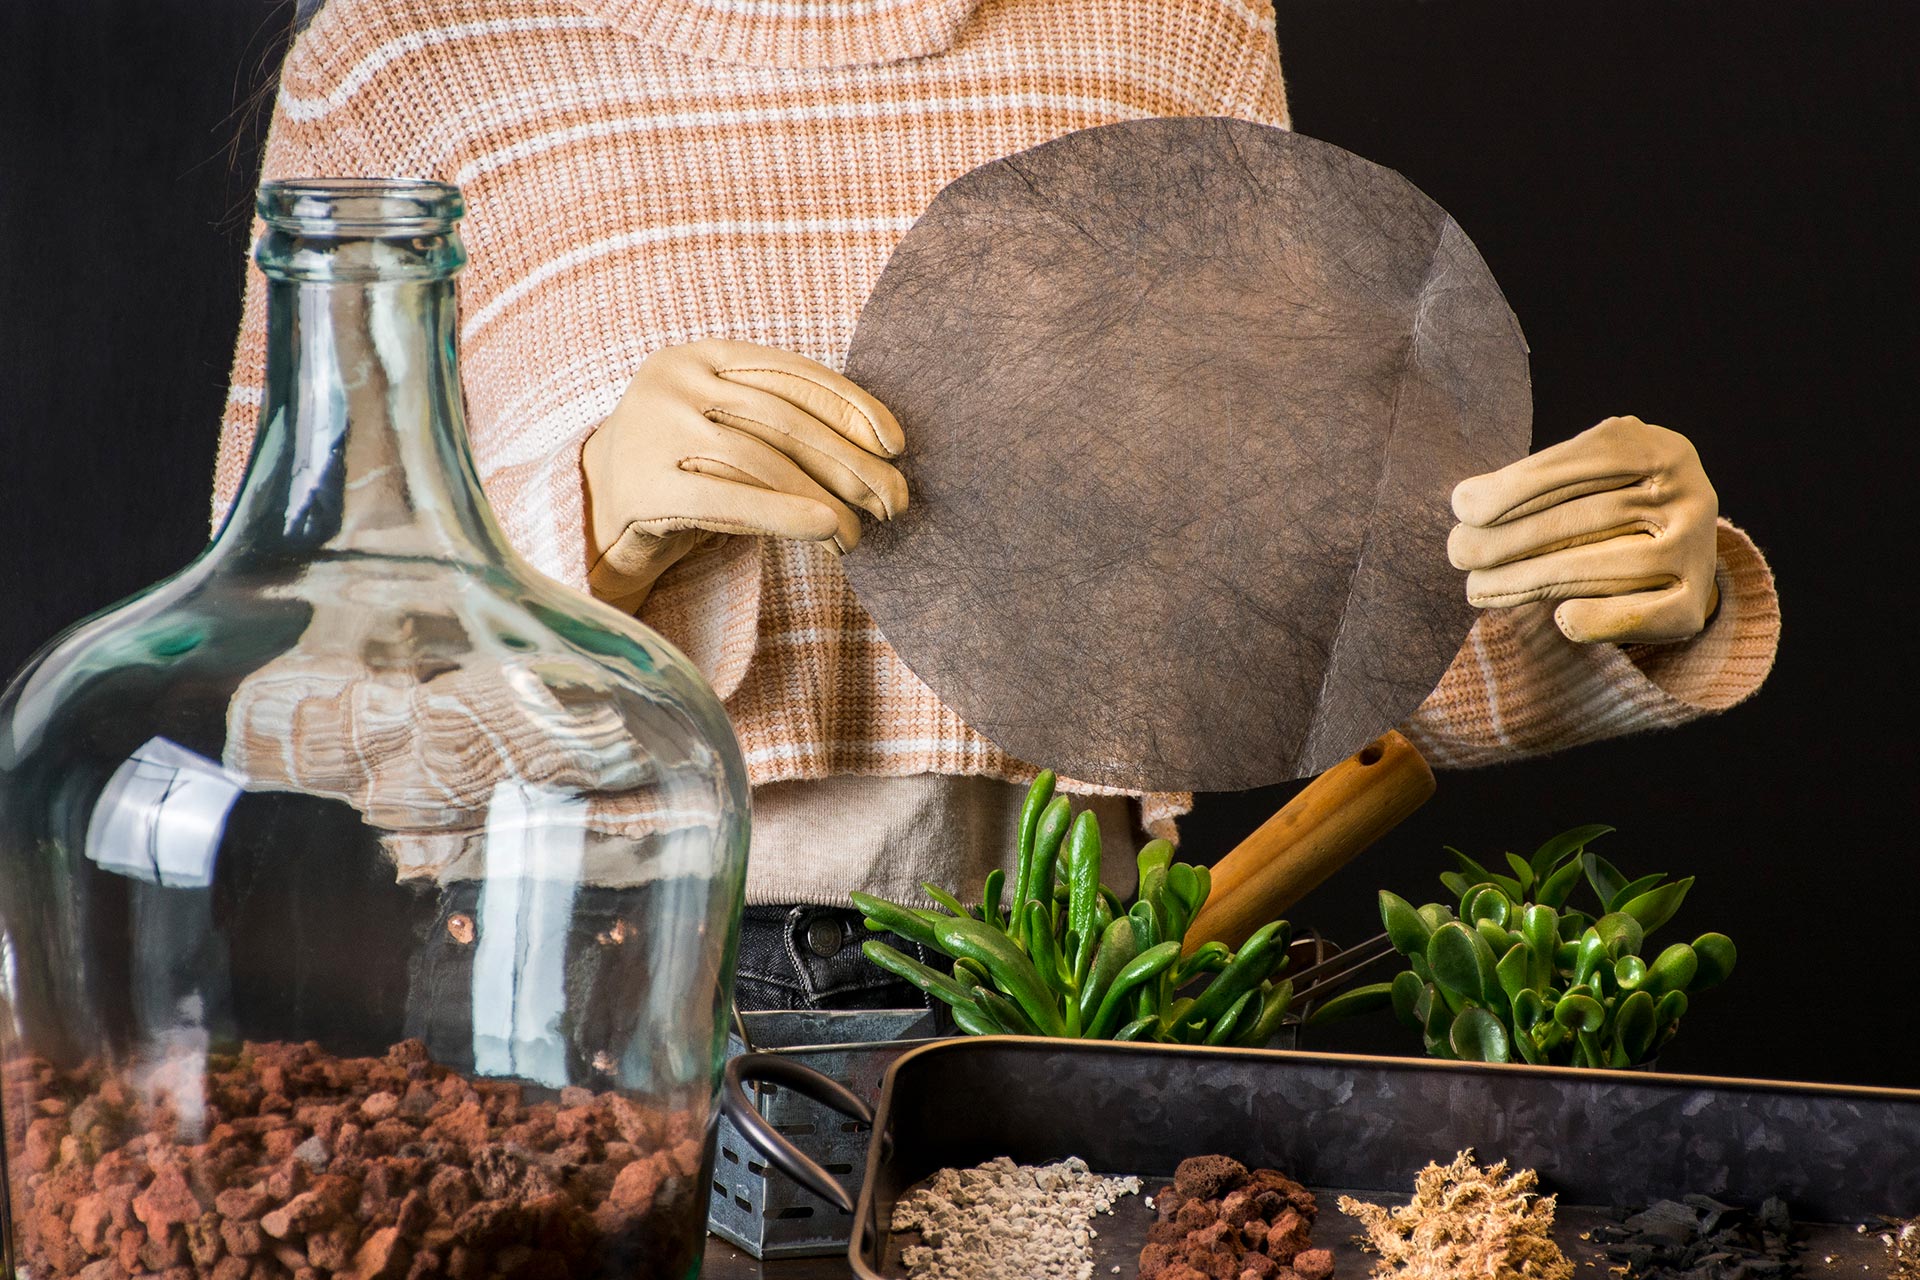
The purpose of the separation layer is to effectively divide each of the terrarium layers. It also prevents the roots from extending into the drainage layer. This will most likely lead to rotted roots!

3. Activated Charcoal Layer
Don’t leave this step out!
Activated Charcoal is probably one of the most important soil amendments of your closed terrarium, in our opinion. It is useful in removing toxins, odors, and mold from the terrarium.

4. Decomposers (optional)
Ever wonder how it is possible to keep mold from growing in your terrarium? Decomposers are the answer
Next, we added springtails which will act as decomposers for our bottle garden. We like to call them the terrarium cleanup crew and boy do they do a good job!
Springtails feed on mold, which is bound to arise in your closed terrarium.

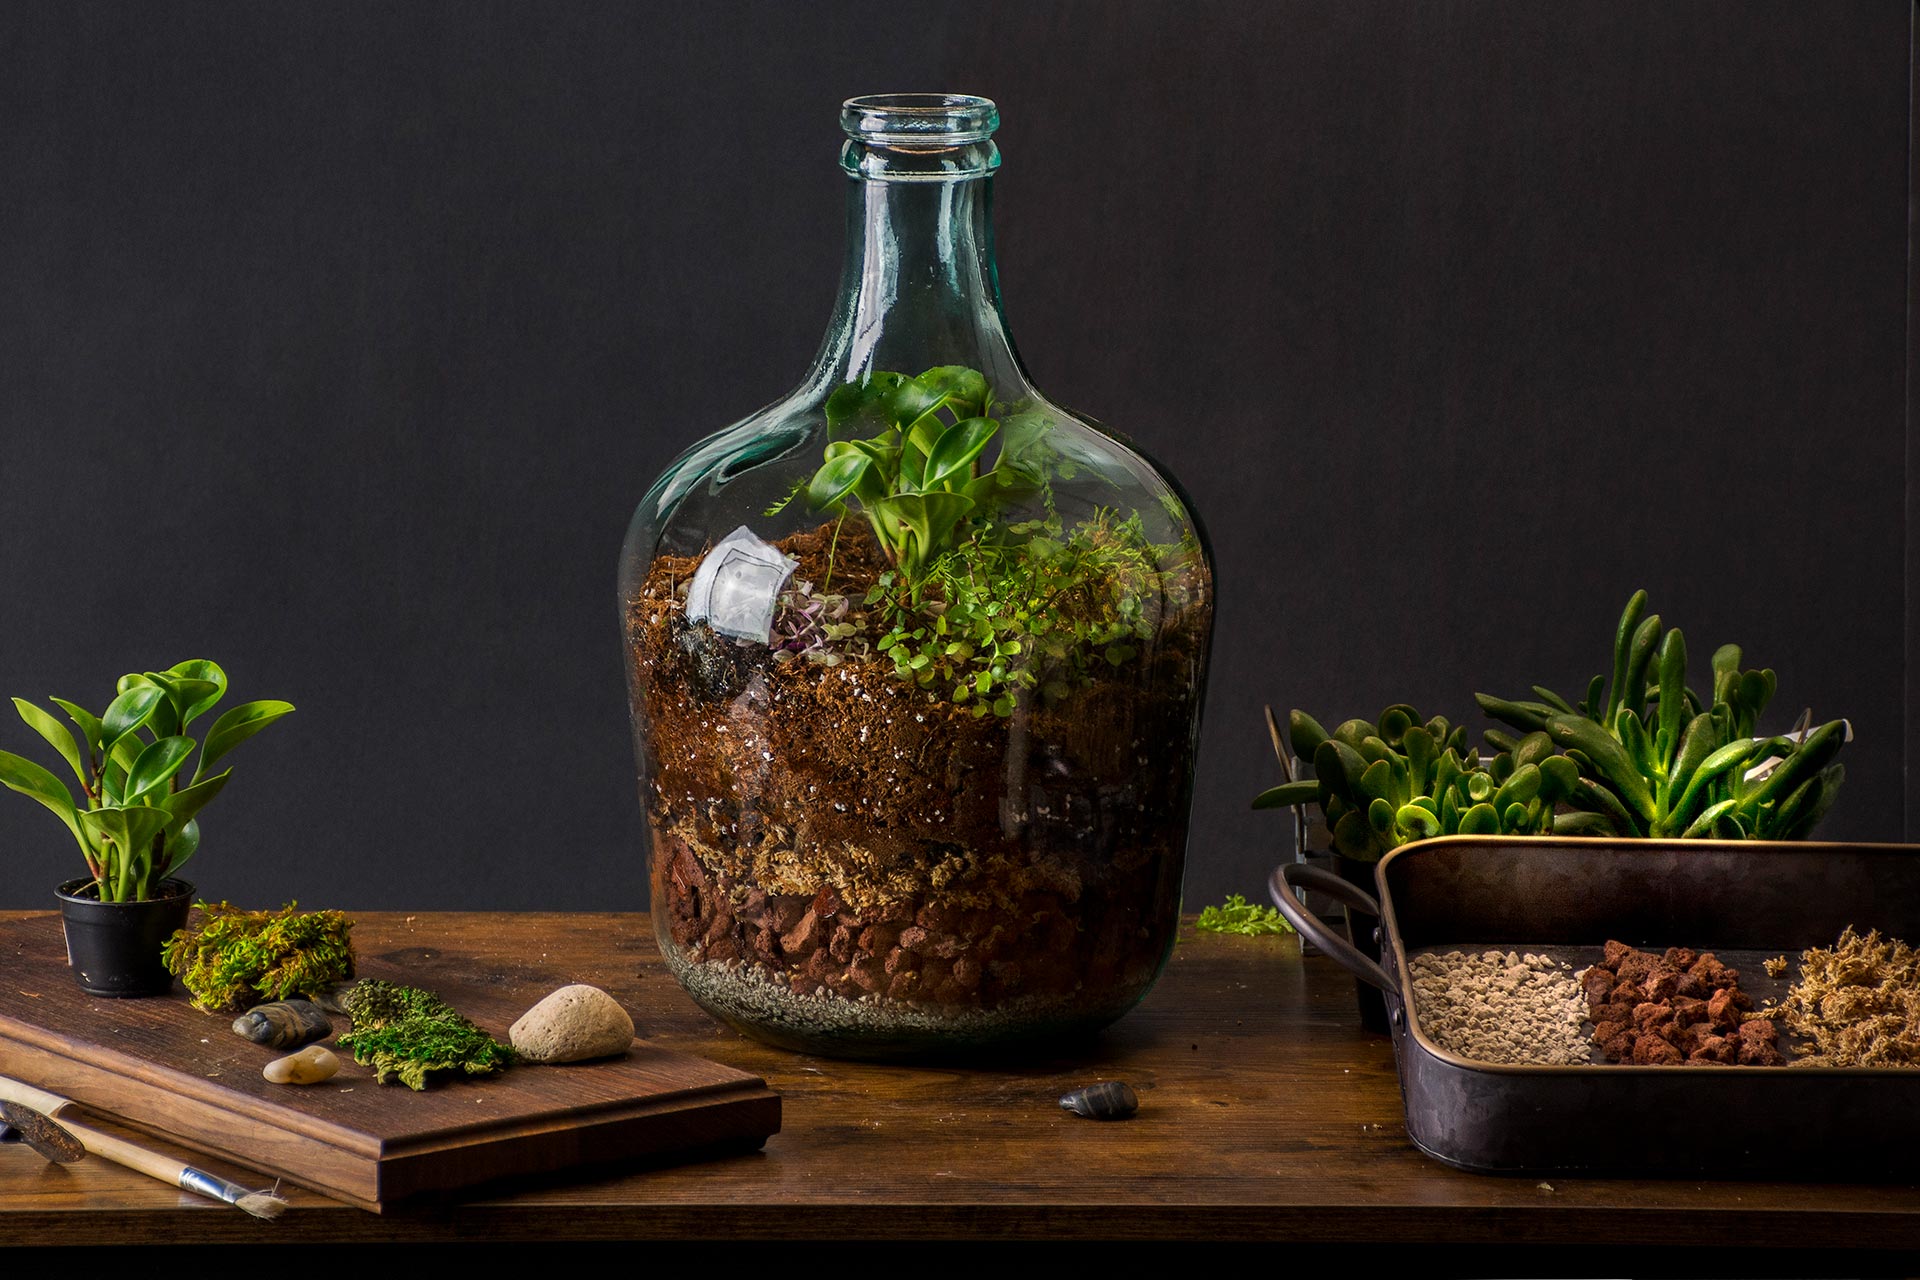
5. Next is the Potting Mix Layer
In regard to your terrarium substrate, it is best to use a nutrient-rich potting mix
Choose a potting mix with added compost for your plants to receive nutrients from. We used a combination of Agromin Potting Mix, as well as some coco coir. You can add about 2 inches of soil or twice the amount of your drainage layer, depending on the size of your container.
Pro tip: Be sure to pre-moisten the potting mix


We created a natural slope on ours, making it looks much more like a mini ecosystem. To do this we used our little terrarium tools to push all the soil to one side- creating a little hillside.
6. Plants!
Make sure that plants are small enough to fit through the bottle opening
Here are some methods for placing plants in a bottle garden:
- Use tweezers to individually place each plant cutting
- Tie your plant to a long piece of string and lower your plant into the bottle garden
- Drop them in the opening and use your tools to submerge the roots in soil

Our baby 2-inch plants were gifted to us by the lovely Hannah from Idyll Mercantile, who is the owner and CEO of Santa Barbara’s first houseplant store. This shop is a must-see if you are ever visiting Santa Barbara.
What works even better for smaller openings are small cuttings, with small root systems. We found that water propagations tend to transplant well in a closed terrarium as they are already used to a wet environment.
You may be wondering, “how did you place the plants exactly where you wanted them?”
Well, we didn’t!
You are quite limited on the design of a bottle garden. Simply place your chosen elements in the bottle and let nature take its course. Uncertainty is part of the process of making a terrarium!

You can make your own terrarium-making tools with things you have laying around the house. Believe it or not a cork attached to a skewer tip is a great tool for patting down the soil!
7. Next, add mosses and other botanical elements (bottle garden aesthetics!)
Add stones, mosses, and driftwood to top off your closed terrarium
Next, add some elements to jazz up your terrarium. For our bottle garden, we used our moss mixes, mood moss, and some stones.

bottle garden aesthetics
As previously stated, we simply dropped in stones and mosses and did our best to spread them out among the terrariums. Just trust the process and it will look beautiful no matter how everything is placed.
8. Water and seal your bottle garden!
Once you are happy with your design, it’s time to water your terrarium thoroughly with filtered water.
We used a turkey baster to water ours. This allowed water to trickle down the walls of the terrarium, reaching all areas of the substrate. While it was time-consuming, the baster did a good job of cleaning the dust off the sides.
Bottle Garden Care
Time to sit back, relax and let your plants (and critters) adjust to their new environment!
You completed your self-sustaining terrarium. What’s next?
For best results:
- Place the terrarium in a place that receives indirect sunlight.
- If watered thoroughly and tightly sealed- a water cycle will take place, allowing the closed terrarium to sustain itself
- After watering and sealing, the water will flow down into the soil. Afterward, condensation will appear on the sides of your terrarium.
- If done correctly, this cycle will continue and there is no need to care for your bottle garden.
- Remove the top of your bottle garden to allow fresh air to flow through (optional)
- If your terrarium plants are outgrowing the space, use sterilized scissors to prune them back.
- Use long tweezers to gently remove any dead plant material in a closed terrarium.
- Just make sure to watch for mold and consider adding decomposers to the ecosystem if the problem persists.

Final Thoughts
We hope this inspired you to give bottle gardens a try! Just imagine how nice this would be as a centerpiece or a botanical component to a bookshelf. We find that the best bottle gardens are those that are modeled from real-life landscapes and use native plant species. There is really no need to buy anything for a closed terrarium if you have access to nature, just step outside and get some inspiration from the world around you!
Happy Growing!
Cheers,
SuperMoss!
So Helpful!!I Need more ufo to creat Ecco system in 120 gallon Tortaise aquarium.Any advice welcome!!Thank You
Thanks so much! If you’re looking to build a self-sustaining ecosystem in a 120-gallon tortoise enclosure, the same terrarium principles apply—just on a larger scale. Create a strong drainage layer (stones or lava rock), add a separation layer, then use a nutrient-rich substrate. High-humidity plants like ferns, peperomia, fittonia, and live mosses tend to thrive in closed ecosystems. Adding activated charcoal helps keep the environment clean, and springtails can act as a natural ‘cleanup crew’ to manage mold. If you need any specific mosses or materials, we’re happy to help point you in the right direction!
Hello,
How much sunlight does a terrarium need? I am looking at making this with my middle schoolers, but our classroom has no windows.
Thanks for your question — that sounds like a wonderful project for your middle schoolers! 🌿
Most terrarium plants need some light to stay healthy, but they generally prefer bright, indirect sunlight rather than direct sun, which can make the terrarium too hot. Since your classroom doesn’t have windows, we recommend using a full-spectrum grow light to give your plants the light they need for photosynthesis. Place the terrarium under the grow light for about 10–12 hours a day, and your plants should thrive. LED grow lights are a great, energy-efficient option and safe for classroom use.